FIRST TUTORIAL WITH GIMP2
Cut and Paste
Black & White with a touch of color method
Merging pics
Page curl effect
Fussy border effect
Flatten Image

INTRO: The purpose of this tutorial is to show you how I did the above pic using the top 2 pics. I used GIMP2, it is a free program which you can find on the Internet. Go to Wikipedia.org type in GIMP and it will take you to the page where you will find the link to download it. It will be at the bottom of that page under 'External Links', it will say "Official GIMP Web site".

START: When you click on GIMP2 this box will appear. Click on File to get the drop down menu.

This is the drop down menu. Click on New to open your pic.

Click on each tab to find your pic. Double click to select.

Your pic will appear in a new window. You can maximize it to make it easier to work with.

When you maximize it you will need to click the GIMP tab at the bottom of your screen to be able to see the GIMP box.

CUT: Choose the select button and drag it over the area you want to keep.

After you select the area you want, click Image and click Crop to Selection

PASTE: After the pic is cropped I want to paste it on another pic.

I open a pic with a black background. This is were I'm going to paste my other pic.

SIZE IMAGE: I want to change the size of the background pic before I paste my pic on it. I want my final pic to be 800x600. Click Image and then click Scale Image.

Enter 600 for Height and click Scale. The width will automatically adjust to 800 after you click Scale.

Now that the background is the size I want. I go to my pic: Click Select, Click Edit, and choose Copy.

Go to the background pic: Click Edit and choose Paste.

After you paste the pic you can move it to any location you want on the background pic. I now want to remove the green plants showing on my pic, and I want to add more of the curtain city area to the black background.

I open my original pic and using the select button we used before, I drag it over the area I want to copy. Then I paste it on my new pic. I keep pasting until I get the effect that I want.

SAVE A PIC: Now that I finished pasting I can save my pic.

To save: Click Edit then Click Save As

The Save Image window pops up. Here you will enter the name of your pic. Click on the tabs to choose where do you want to save it. Select the file type, i.e. JPEG, PGM, etc. Then Click Save.

I chose JPEG and now the Save as JPEG window pops up. Here you choose the Quality you want your pic to be saved at. I choose 90 for my pics. Click Save

After you save your pic you can minimize it or close it. Now I open the 2nd pic I want to work on. I NEED TO SAVE 2 COPIES OF THIS PIC.

BLACK & WHITE EFFECT: I open the First Copy of my pic. This is the copy I want to change into Black and White. To change it do this: Click Colors then Click Desaturate

Another window pops up. On this window you can choose the shade of gray you want. Play with the various options until you are happy with the results. Then Click Desaturate

SPOT OF COLOR ON B&W: Credit for this part goes to my friend Leah from SimTales, who showed me how to do this effect.
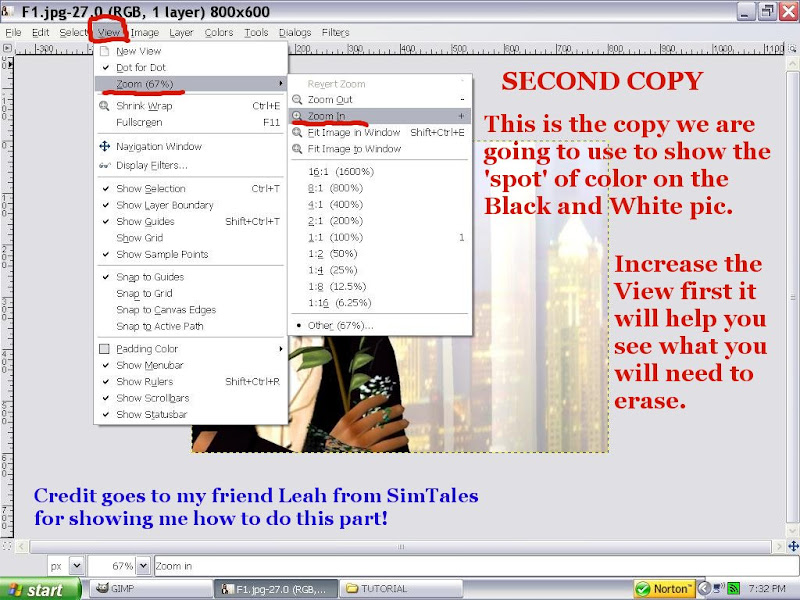
Now I'm going to work on the Second Copy of my pic. This is the pic we are going to use to show the 'spot' of color on the B&W pic. It will be easier to do this if you increase the view of this pic. Click View, Click Zoom, Click Zoom In

ERASE: Now select the eraser on the GIMP box, choose the size of the eraser, and erase everything but the red rose.

Increase the View again as you get closer to the rose.

After you erased everything but the rose, your pic should look like this. Save this pic.

MERGING PICS: Now that both pics are ready we are going to Merge them. IMPORTANT: Both pics have to be the SAME SIZE or they will NOT merge!

You can do this step on either pic, I chose to do it on the B&W pic. To merge the pics: Click on Filters, Click Combine, Click Depth Merge

The Depth Merge window pops up.

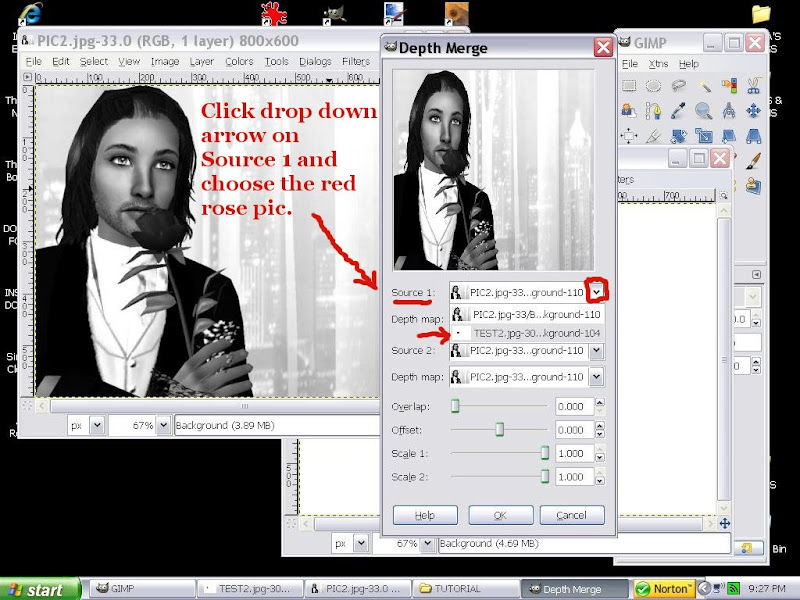
Click drop down arrow on Source 1 and choose the red rose pic.

Now click the drop down arrow on Depth Map and select the red rose pic.

Slide the Overlap, Offset, Scale 1, and Scale 2 buttons until you are satisfied with the way it looks. Click OK when done.

After you click OK your pic will look like this. If you want to adjust the color of the rose do this: Click Colors, Click Hue-Saturation

Increase the Saturation level to make the color of the rose stand out more. Click OK when done.

PAGECURL EFFECT: Now both pics are ready for the next step. We are going to use the Pagecurl effect on the B&W pic, which we will now call Pic B.

Select Filters on Pic B. Click Distorts then Click Pagecurl

The Pagecurl Effect window pops up. Choose Upper Right for Curl Location. Choose Vertical for Curl Orientation. Make sure the Shade under curl is checked. Click OK when done.

Your pic should look like this now. We are ready to merge the pics. Click Filters and Depth Merge on this pic.

Sometimes this Error box pops up. I'm sorry I don't know why it does. I just close the box and go on.

To get the above result enter the following on all fields: Source 1: Pic A, Depth Map: Pagecurl layer. Source 2: Pic B, Depth map: Pic B. Overlap: 0.452; Offset: 1.000; Scale1: -1.000; Scale2: 0.0635. Click OK when done.

FUZZY BORDER EFFECT: Now that your pic looks like this we are ready to add the Fuzzy border.

Click Filters, Click Decor, Click Fussy Border

Another window pops up. On this window you can select the color, the size of the border, and you can add a shadow to your border. I chose white, size 15, and no shadow. Make sure all these are checked: Blur border, Work on copy, and Flatten image. Click OK when done.

FLATTEN IMAGE: Now we are going to save the pic. Before we do that we are going to flatten the image.

When we added the Pagecurl and the Fuzzy border to the pic it created new layers. We need to 'merge' these layers. To do that Click on Image then Click Flatten Image.

Now we can save the pic! Click File, Click Save As, and fallow the steps I gave you before about saving pics.

I hope you found this tutorial helpful!

1 comments:
Leah said...
That looks GREAT, Zayury!
Wonderful job.
I think I should really get the GIMP now, because some of these effects I think I won't be able to do in PSP...
2/5/08 3:23 AM
sandybvv said...
:D Great Job Zayury, I can do some of those things in Photoshop too!! Thank you!!
I really really appreciate your time in making this tutorial! :D
I will try some of the stuff you taught here soon :D
Thank you!
2/5/08 9:29 AM
chardonnay said...
Wow, such a great job! And you make it look so easy!!!
But now my brain hurts!!! LOL!!!
I am not so sure I will ever aqcuire this particular talent!!!
2/5/08 1:57 PM
drewsoltesz said...
Dear God, that is hard!! LOL!! Truly, thanks for sharing, I have photoshop 7, I will see if I can do some of what you so wonderfully laid out here! Sure you didn't teach in another life? You explained everything so well!
Cheers my mate!!
~~Karen
2/6/08 10:41 AM
ZAYURY said...
Thank-you very much, you wonderful ladies! :wub: If this helped you a little than I am thrilled! :rah: I do apologize for the length, but I know some of you don't have GIMP2so I figured I had to really
'break it' down. ;)
Leah, my friend, thank-you again for your advice and support on this and many other things! :wub:
2/6/08 1:31 PM
s_cains said...
Hi thanks for doing this, it really helps. However do you have the exact link to the program since it says on wiki that no results were found. I appreciate any help you can give.
Thanks
Sam
2/9/08 6:09 AM
Jane said...
You make it all look so easy :) My re-cycle bin is full to the brim. Off to try again :)
2/9/08 8:21 AM
DarkBorder said...
Thank you for this! :)
2/9/08 9:12 PM
ZAYURY said...
Dear ladies thank-you very much for commenting on my 'tutorial' lol! ;) I apologized if you had a hard time finding the link to download the program. I made a mistake, you need to type GIMP not GIMP2 in search at Wikipedia. :(
This is the link for the info on it at Wikipedia.org
http://en.wikipedia.org/wiki/GIMP
At the very bottom of the page under 'External links' click 'Official GIMP Web site' this takes you to the download link.
http://gimp.org/downloads/
Again, thank-you and I'm sorry for the confusion! :)
2/10/08 10:26 AM
Nyell said...
This looks great, I'll surely try it out.
2/20/08 8:01 AM
ZAYURY said...
Dear Nyell, thank-you very much for the sweet comment! I hope you found it helpful! THANK-YOU! :)
3/4/08 6:32 PM
TATO said...
Nice Job!
A really interesting way to do freely images with GIMP, instead Photoshop.
I also use GIMP in my Ubuntu LINUX!
Orig posted 11/11/08 2:39 AM
11/12/08 8:24 AM
ZAYURY said...
HELLO AGAIN! :D Oh, my dear Tato, THANK-YOU for leaving such sweet comments on both my story and this tutorial! *besitos* ;)
Orig posted 11/11/08 7:12 AM
Post a Comment